I always have been fascinated by photography.
But with the introduction of the digital camera it all became too easy, too predictable …to me.
So I forced myself to go back to the roots of real analog photography.
Not just by making the photograph itself, but by controlling the entire photographic process.

This brought me back to the middle of the 19th century, to the amazing Collodion wet plate process.
And every single day I feel challenged to refine and improve myself.


For my website please visit : www.alextimmermans.com

Alex Timmermans
Holland


"You don't take a picture, it's given to you"
Posts tonen met het label technique. Alle posts tonen

woensdag 21 januari 2015

Expanding the life span of your developer

I know, it was about time posting something new on my blog.
A lot of things happened in the past few months.
Some great gallery shows, new studio etc. But that I will keep for my next blogs.
In the meantime I ran a quick test how to expand the life span of my developer.
It's nothing new that you can't store your developer for ever.
On the long term, depending on the light and temperature, it will darken and won't function anymore as it should be.
In the old days I stored my chemicals in those "collapsible" bottles.
But the downside was that they weren't transparent. So you weren't able to see how it looked like
So I ran a test using the "Vacuvin" plugs. Every wine lover now knows what I am talking about.
These plugs are being used to suck out the oxygen of a wine bottle which makes you able to store it a little longer after the bottle was opened.
I did the same with 2 bottles of developer.
One was stored with the Vacuvin plug and the other just with a normal plug.
Both bottles were filled with fresh developer and stored in front of a window, directly into the sun
and above the central heating for about 2 weeks.
As you can clearly see the right bottle became more yellow already after a few days.
The left bottle (with the Vacuvin plug) remained at almost the same color.
So this is a very easy way to extend the life span of your developer in a rather cheap way.


P.s. running the same test with a collodion mix now.
and ofcourse not placed above the central heating or in the direct sun.... lol


zondag 10 februari 2013

Cleaning the inside of a bottle


This short video shows how easy it is to clean the inside of a glass bottle.
Make sure to use demi water if this is a silver nitrate bottle!


zondag 6 januari 2013

Modifying a normal 4x5" film holder into a wet plate holder


I have done this before with a 8x10"holder, but this time I tried modifying a 4x5" holder.
It is as easy to do. The only thing is that you need some little tools.
This timeI have used a Dremel with a small cutting blade.
The whole process didn't took me more than half an hour.
So if you are a bit handy it is really a piece of cake.
First you tape the inside which makes you able to mark the actual needed size.
You can go up to 8.4 mm x 11,4mm

BE AWARE !
There are several 4x5"plateholders available.
Make sure you use the more luxury versions.
They have a massive alluminium plate inside it instead of 2 thin plates.
The cheaper versions with those 2 thin plates just don't work and will cause
a lot of trouble, like contamination, when used with wet plate.
This used Fidelity Elite is the good version.


I have used a Dremel with a cutting blade for metal.


As you can't reach the corners with a round blade you will have to use 
a normal saw blade suitable for metal to cut out the last pieces 


Use a file to smoothen the cutted pieces and drill little holes in each corner.
The drill measures 1.5 mm


Use 99,9 pure silver wire for the corners and glue them with a rapid glue.
The glue is needed to make sure the silver wire is much more solid and
to be sure it doesn't wiggle anymore.


Don't forget to protect the cutted alluminium with a strong paint.
 I have used nail varnish which is also available in black. It's very solid and dries fast.


Et Voila, you have made yourself a perfect usable wet plate holder!


zondag 21 oktober 2012

New dark room lights


Two weeks ago i visited a do it yourself shop and by accident i stumbled
on some energy saving bulbs.
I bought one, just to give a try.
Well the difference between my "antique" bulbs is HUGE.
I was really surprised how big the difference was between these two bulbs.
I had the feeling not being "blindfolded" anymore in my darkroom.
The best thing is that these bulbs have no influence on the wet plate process.
No fogging and a much much better sight on what you are doing
So HIGHLY recommended
 
Although its difficult to show you the difference.
On your left hand the old buld and on your right hand the new one.


dinsdag 22 november 2011

How to finish an ambrotype

After you have varnished your plate there might be some varnish at the back of the plate.
First let the plate rest for a few days. Fresh varnish is very fragile.

When cleaning the plate lay it flat on a clean piece of paper.
Use a razor blade to cut of the varnish from the back of the plate.
Put some alcohol on a clean paper towel and clean the back a few times untill you will see no cleaningmarks anymore.

Than use a simple paint roller and black acrylic paint to paint the back.
You will have to do that twice for the best result.
Now your plate is ready to show.

If you store your used roller in a simple glass jar you can keep it ready for use for months.


zondag 11 september 2011

Three fixer test

Recently I bought Amaloco x-89 rapid fixer as I was wondering if it would work with Collodion. Well it did, and I was surprised by the result.
Is it a scientific test. NO !  but I tried to show you the differences using three different fixers.

The result ? Well they are close to each other. The KCN gives a bit more yellow look.
Can you call it warmer ? Maybe, but the differences are really close.
Different kind of varnish will have much more influence on the color than the fixer itself

The other two show a little bit more magenta/red tone. But again, it's close.

Just one remark. It looks like the KCN also has a bit influence on the exposure ???!!!
It looks just a tad brighter.

If you make two identical pictures (which is almost impossible with collodion) and you lay them side by side you might notice some difference. But when showing just a single plate for me it is almost impossible to tell wich fixer was used.
So, do you really need KCN to get the famous "coffee and cream" color?. NO!
They only downside is when using a rapid fixer or hypo is that you need a longer washing time for your plates as these two chemicals dissolve less easy in water.
So when working in a studio there is no need at all to use KCN

From left to right
1. Amaloco x89
2. KCN fixer
3. Natrium Thiosulfat (HYPO)

First I pre cutted a plate so it was easy to break it after the developing stage.


 Three fixers. from bottom to the top : Amaloco, KCN, Natrium
After developing 


Again, from left to right : Amaloco, KCN, Natrium Thiosulfate
Plates were still wet.


When dry the difference is even closer.


maandag 22 augustus 2011

How to unscrew a stuck lens element.....????

Recently i bought myself a beautiful Dallmeyer 3a!
It's in beautiful original shape.
But there was one problem. All the lens elements were stuck.
Also the soft focus function.

As i have tried this solution before on a Hermagis with a severe stuck rear element i gave it a try again, but now with this beauty.

All you need is a fitting piece of thin rubber, a screwdriver, a LITTLE hammer and a large hose clamp.
Cut the rubber just as wide as the clamp itself. Make sure you cut it a little shorter to keep the place open where the screw is.
This to make sure you get an equal pressure around the element.
Tighten the hose clamp slightly. There is no need to tighten it hard! When you tighten it to hard you might break the glass!!!
After that you take a small hammer and gently tap on the screw in the direction the element has to go loose.

Before this solution i have tried several options. I tried silicon spray several times over a few days, tried to unscrew it while wearing special rubber gloves.

Nothing worked. Now it came loose within 2 seconds.


donderdag 14 juli 2011

Silver bath maintenance

Recently I noticed some problems with one of my silver bath solution.
While developing plates it was more difficult to spread the developer over the plates.
Of course you can solve it by adding a little alcohol to your developer but on a certain point that won't help anymore

So it was time to start maintenance of my silver bath.
I didn't had any other problems so  I decided just to boil the solution back to a volume of about 90%. As a matter of fact, just heating up the Silver Nitrate is even more than enough. You only need to get rid of the Alcohol and Ether which came in with the Collodion.
Alcohol already boils at 79 degrees Celcius and Ether already at 35 degrees Celsius.
make sure you boil the silver solution in a stainless steel pot and in a very well ventilated room or outside.
After doing this I add the needed volume demineralised water and the bath CAN turn VERY cloudy.
Don't worry about that. It's absolutely normal and has nothing to do with maybe a bad quality of Demi water.
Just shake the bottle and leave it that way for a few hours it will clear and you will see a lot of dirt at the bottom of the bottle.

After that I sunned the bath under a face tanner. filtered it twice, checked gravity, added the needed silver nitrate and it was ready for use again.

Result : a perfectly clear and good working silver bath again.
So it takes a few hours but the result is worth it.
There is NO need to iodise your Silber nitrate again. It's ready for use

NOTE: I have been working with the "same" silver nitrate bath from the start in 2009. I NEVER added anything except silver nitrate and water. So No acid, no Clay no NOTHING.
If you treat your Silver nitrate with care you can work with it for many years!


After adding Demi water the solution can turn cloudy. Don't panic.
This is absolutely normal

 Lot's of dirt after the first filtering
 Gravity is too low. Should be around 1.08
Added extra Silver nitrate untill it reached the exact gravity and it's ready for use again
 

maandag 11 juli 2011

Making your own varnish

Making a varnish solution isn’t such a big job.
Actually, i like it a lot. Love the smell.........

First you need to get sandarac.
Sandarac (or sandarach) is a resin obtained from the small cypress-like tree Tetraclinis articulata.
Because it contains lots of dirt. I once had an ant in my bottle , you need to filter it very very good.

There is no need to crush the small pieces as it dissolves quite easy in alcohol.
Just measure the needed quantity and drop it in a bottle with the right volume of alcohol.
You can leave it like that for a day or so or take the bottle and shake it several times during watching TV.....
When the resin has dissolved you will have a very cloudy solution which needs to be filtered.
For the first 2 times you can just use normal coffee filters.
You will see the difference as it becomes clearer and clearer after each filtering.
After using the coffee filter i always use laboratory folding micro filters.

After filtering it twice again you will obtain a very clear yellow solution and it is ready as a base.
You will only have to add the needed volume lavender oil to finish this job.

 Weighing the needed amount of sandarac


 There is lots of dirt in the sandarc which needs to be filtered out


 After the first filtering you can see the difference already


 After 2 times using a coffee filter now you filter it twice using micro filters


 At the right you can see the final result.
A clear solution (like a nice glass of beer..)

zondag 19 juni 2011

Maintaining your silver bath

Maintaining your silver bath is one of the most important things in the collodion process.
It will prevent your from fogged plates, comets, comets and other nasty things.

Sunning your silver bath is one of the easiest things to do.
Just pour it in a glass bottle and place it outside into the sun.
Leave the bottle open to allow evaporating the ether and alcohol which is left in the solution.
Just in case, put an old stocking on top of the bottle to prevent something getting into the bottle.
ALWAYS put the bottle in a safe place where nobody has access to it !!

After sunning you will notice that the silver solution has turned light grey.
Now every organic part in it has been exposed. This can be filtered out very easy using normal cotton cleaning pads.
Put these into the bottom of a funnel and filter the solution several times until the solution and the cotton pads are clear/white.

Just as easy as that....


 Left bottle after sunning for a few hours outside


Left cotton pad after first time filtering the silver bath
Second one after the fourth time.

zaterdag 30 april 2011

"amazing discovery"

After reading some posts from Cor and Andrew at the Collodion forum i did the aceton test. It means adding a little aceton which should recover old dark red Collodion

I had a batch of collodion which was more than 6 months old.

Adding a bit of aceton (2ml at 100ml mix) cleared the collodion mix within 5 days. I assume the process hasen't stopped yet, so it might become a little clearer.

I did the test. I taped a plate and flowed the plate at the same time with 2 bottles. Not easy i can tell you (LOL).
As i had no model (My wife doesn't want to be photographed on Colldion...) i had to take some "dummies"

The left side of the picture is with "renewed" collodion'.
I have used 2 x 4 x 24 watt CLF bulbs. At each side 4 bulbs to get equal lighting.
Exposuretime was 6 secs which is just a little bit more as when i use a fresh collodion mix.
Developing time about 15secs. And ofcourse developed in one flow.
Well, as you can see the result is amazing !!

UPDATE !! : Another update ( not so good....)

I just varnished the plate ( at least i tried to do) with sandarac.
The aceton must have weaken the collodion as the varnish dissolves the picture in a rapid way.
I have never had this problem before...
The part with the old colldodion does not have this problem.

So this might not bring what we are looking for.

Alex


zaterdag 23 oktober 2010

Normal film holder for wet plate photography

Yesterday i bit the bullit and started working on a normal 8 x 10 " film holder.
I wanted to make it suitable for wet plate photography.
Alexey Alexeev showed mee some pictures of his plate holder.
To be honest, it is really very easy to do. The plate between the two slides was actually thicker than i expected. It was very stiff and about 1 1/2 mm thick.
The whole process only took about 30 minutes.

1. Put some tape to on the inside of the film holder and put on the glass which you want to use. Draw a line around the glass plate so you have the needed size
In my case it was 18 x 24 cm


For cutting i have used a small normal grinder which allows me to adjust the speed.
I have used a special thin cutting blade.


Because you can not reach the corners with the grinder i have used normal sawblade, which you use fur cutting alluminium or iron, for cutting the corners.
After that just use a small file for finishing.


For the corners i have used stainless steel wire of ,75mm thick or even better is pure silver wire.
I drilled the small holes with a small drill of 1 mm.
Make sure you cover the cuttings and holes with some transparent (nail)paint
Et voila, a plate holder suitable for wet plate photography


dinsdag 17 augustus 2010

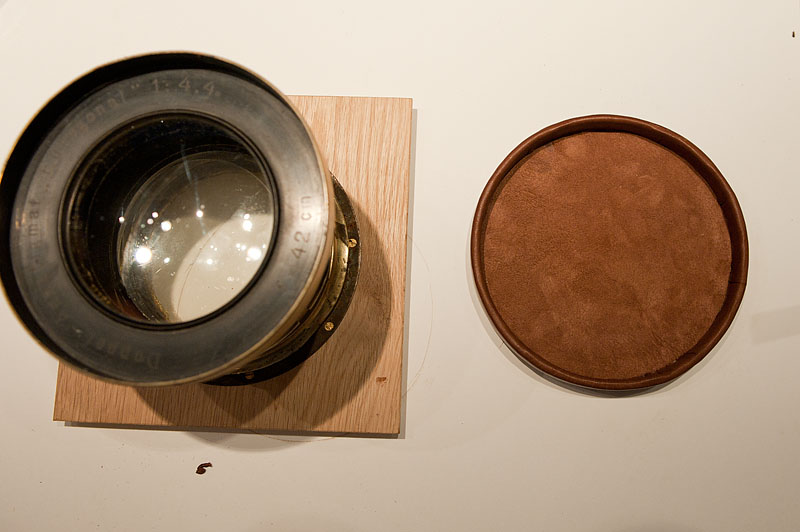
making your own lens cap isn't that difficult

With some great help from Unrealalex from Russia i managed to make some nice lens caps.  http://unrealalex.livejournal.com/45453.html

For this i have used normal “passe partout” cardboard.
First cut a spacer. The thickness of that spacer is needed to fill the space when the leather is wrapped on the inside of the cap.

Make sure you put some extra tape on it. Otherwise this spacer wil stick onto the actual lens cap. Cut 2 identical strips. The width depends on the space you have on the lens hood. But don’t make it wider than 2 cm otherwise it won’t come of smoothly. Cut the first one at the needed length and wrap it around the lens (on top of the spacer which is already on the lens. Make sure that the ends fit perfectly. Secure it with a tape. Then wrap the second strip around it and make sure it fits perfectly also.
After that, take the two strips of and spray them with a glue and put them on the lens again. Secure them and Leave them for about 1 hour.


If you want to see larger pictures, just click on them


Then cut 2 squares about 2 cm wider than the actual capsize and glue and press them together.


After drying put some glue ( i have used simple white wood glue) on the strips and place the square underneath them. Use the weight of the lens to press these squares onto the strips which are taped around the lens. Leave it for about half an hour again. Make sure you wipe of the glue on the outside.


After a half an hour take of the cap, remove the glue which is left on the inside and shape it with a sharp knife. Use a sharp knife. Most accidents occur with knifes which are NOT sharp enough. Now you can see where the tape on the spacer is needed for...


Grind the edges until they are smooth ( i have used an electrical grinder for that, which works much faster)


Now cut a, larger than really needed, piece of leather and let it soak in normal water for about 30 minutes. I have tried it with dry leather but that only works with very small lens caps. When the leather is wet, it is much easier to shape it around the lens cap.
Make sure you get real thin leather. The best leather is sheep or goat leather.


Put the same white glue onto the lens cap.. Take your time. Stretch the leather nice and easy around the cap. Don’t hurry and don’t stretch it too fast, otherwise the leather will tear !!


To hold the leather. I have used a tie wrap which works much faster than anything else. Just leave it overnight. Don’t force it drying with a heater or so !! Be patient.


When the leather is dry, take of the tie wrap, take the cap of the lens ,and cut of the larger parts of the leather. Make sure there is enough leather left for the inside of the cap.


Now the most difficult part of making a cap starts. You will have to fold the leather to the inside, but the leather is actually wider than it should be. The easiest way to do this is putting on the cap without cutting the leather perfectly. Leave it for about one hour on the lens and after that you can see perfectly where it needs some extra cutting.Take your time, and do this step by step. For this part i have used normal contact glue

.

When everything is folded and glued you only have to cut the inlay of the cap. Cut it the same size as the actual lens shade. Glue this part into the lens cap. Start from the middle and work to the outside. You are able to stretch the leather if needed and let it fit perfectly.


For finishing just use some neutral shoe polish.

Using the right material it will take you no longer than about half an hour making a perfect cap.