I always have been fascinated by photography.
But with the introduction of the digital camera it all became too easy, too predictable …to me.
So I forced myself to go back to the roots of real analog photography.
Not just by making the photograph itself, but by controlling the entire photographic process.

This brought me back to the middle of the 19th century, to the amazing Collodion wet plate process.
And every single day I feel challenged to refine and improve myself.


For my website please visit : www.alextimmermans.com

Alex Timmermans
Holland


"You don't take a picture, it's given to you"
Posts tonen met het label hardware. Alle posts tonen

donderdag 24 januari 2013

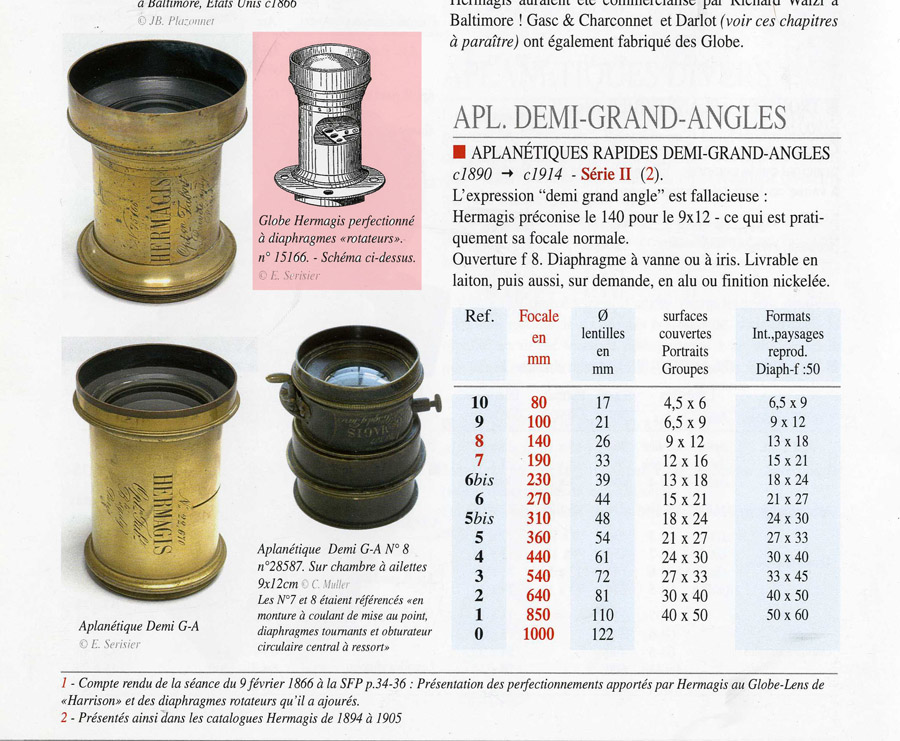
Another beautiful Hermagis lens


By now the most of you know that I have a weakness for Hermagis lenses.
Not just because of the optic quality, but also because of the beautiful finish of these lenses.
Just have a look at the beautiful engravings…
A few months ago I was able to buy this very rare large  Hermagis
demi-grand-angles avec rotateurs”.

This is an extremely nice piece off engineering.
By turning the lens hood you can change the aparture which is build inside the lens.
This mechanism is made of 2 brass tubes slided into each other.
They have a fitting which makes it impossible to put even a human hair between them.

Can you imagine? This lens was handmade at about 1872!
Just have a look at the lens design. perfectly round and polished by hand

Additional info

I contacted Geoffry Berliner about this lens,
Geoffry is director off Center for Alternative Photography in New York..
He's also a collector of ancient lenses.

You really should have a look at their webiste.
http://capworkshops.org/
I want such a daylight studio......
It's on my wish list to visit once.

He has send me the following information about this Hermagis:


"It is a Schnitzer / Harrison Globe formula from the 1862 patent.
This formula was licensed out to European manufactures of the period as it was
too expensive to export due to tariffs and import fees.
The Emil Busch Pantoscop is in the same category as your Hermagis.
A great find of a very rare and beautiful lens."



zondag 6 januari 2013

Modifying a normal 4x5" film holder into a wet plate holder


I have done this before with a 8x10"holder, but this time I tried modifying a 4x5" holder.
It is as easy to do. The only thing is that you need some little tools.
This timeI have used a Dremel with a small cutting blade.
The whole process didn't took me more than half an hour.
So if you are a bit handy it is really a piece of cake.
First you tape the inside which makes you able to mark the actual needed size.
You can go up to 8.4 mm x 11,4mm

BE AWARE !
There are several 4x5"plateholders available.
Make sure you use the more luxury versions.
They have a massive alluminium plate inside it instead of 2 thin plates.
The cheaper versions with those 2 thin plates just don't work and will cause
a lot of trouble, like contamination, when used with wet plate.
This used Fidelity Elite is the good version.


I have used a Dremel with a cutting blade for metal.


As you can't reach the corners with a round blade you will have to use 
a normal saw blade suitable for metal to cut out the last pieces 


Use a file to smoothen the cutted pieces and drill little holes in each corner.
The drill measures 1.5 mm


Use 99,9 pure silver wire for the corners and glue them with a rapid glue.
The glue is needed to make sure the silver wire is much more solid and
to be sure it doesn't wiggle anymore.


Don't forget to protect the cutted alluminium with a strong paint.
 I have used nail varnish which is also available in black. It's very solid and dries fast.


Et Voila, you have made yourself a perfect usable wet plate holder!


dinsdag 25 december 2012

Making an insert for your plate holder

The good thing about wet plate photography is that you are able to choose your own plate size.
The only thing you need is a suitable insert for your plate holder.
Contamination is problem number one with wet plate photography.
Contamination starts when the silver nitrate on the plate gets in contact with dirt in your plate holder.
Most of the time that contamination shows up at the top of the image
as the glass is upside down in your holder
That's why a good plateholder has as less contact with the inlay as possible.

Here I show you how to make a good working insert.
This time I have used Dibond, which is a laminated material.
A plastice core covered with 2 very thin layers of alluminium.
The good thing of this material is that is is very stiff and light weight.
The down side is that it has alluminium on it which reacts with the silver nitrate.
But a good matte black paint will eliminate that problem.


UPDATE


I did one extra thing with the plate holder.
The thin silver wires wiggled a bit so i glued the ends and this works much better.
The fitting of the silver wires is much more solid now.
Sprayed the whole inlay matte black and it's ready for use now.


This is a picture i got from Sean Mckenna a few years ago.
It shows an original wet plate holder with inserts.


First i use a circular saw to cut the plate to the right dimensions.


As you are unable to reach the corners with a circular saw,
 I use a saw blade to cut the last pieces.


After that I have used a Dremel to make curves in the corners.


Now I use the circular saw again to make the inside of the holder just a few mm wider.


Again use the dremel to take out the last parts.


Drill a few tiny holes needed to insert the silver wire.


Make sure you bend the silver wire exactly a the good size before putting in into the small holes, otherwise it is going to be difficult to make it all tight enough.


The only thing I have to do now is spraying it with a matte black paint and the holder is ready for use.
Making this insert took me about half an hour.
Ofcourse you can do this also with some hand tools

zondag 21 oktober 2012

New dark room lights


Two weeks ago i visited a do it yourself shop and by accident i stumbled
on some energy saving bulbs.
I bought one, just to give a try.
Well the difference between my "antique" bulbs is HUGE.
I was really surprised how big the difference was between these two bulbs.
I had the feeling not being "blindfolded" anymore in my darkroom.
The best thing is that these bulbs have no influence on the wet plate process.
No fogging and a much much better sight on what you are doing
So HIGHLY recommended
 
Although its difficult to show you the difference.
On your left hand the old buld and on your right hand the new one.


dinsdag 31 juli 2012

Found better plate rack

All from the start i have been using the plate racks made by IKEA.
Cheap and good. But when shooting larger plates and storing them in the IKEA rack it somehow became a little tricky
( because of the weight) as i mainly use 3mm glass.

Yesterday we were at Amersfoort ( beautiful place btw) and we entered a store called Dille & Camille.
I found there plate racks and i can say, they are MUCH sturdier than those from IKEA. Thicker wood and better build quality
They are selling 2 sizes and i bought the smallest one.
Still suitable for holding up to 13 plates which is more than enough for me.
Price ?  Euro 16,95.
Not as cheap as those from IKEA but still cheaper than making it yourself.

Strangely they only sell the small one through the internet.

In the picture you see plates of  10,5" square.

zaterdag 21 juli 2012

The first use of my new mobile darkroom


This morning we finally had some stable weather. Not much sun, but at least no rain....
So we, my friend Ferry and me, headed to "Heeze castle" which is situated in a beautiful environment.
There is a little river at the back of the castle which is surrounded by beautiful large Beeches and ferns. Very nice diffuse light.
But on the other hand extremely long exposure times up to 22 minutes !!!.
Never had exposure times that long before.
Tried some different (wide angle) lenses but i still prefer shooting with petzvals.
I just love the shallow dof. Also for landscapes

This one is a 18 x 18cm alutype.
Exposure time 12 secs.
Hermagis petzval aprox 12 inch f4


The working table is even bigger than the tent itself.


The tent is awsome. Within just one minute it's fully operational


Ferry finally had the opportunity to pour his first wet plate. He's talened! 


maandag 16 juli 2012

Made some red windows for my new tent

Because the windows of the Eskimo tent are made of transparent plastic
i had to find a solution to make them red.
Recently a visited a customer of mine who has a welding factory.
For protecting the eyes of the visitors they were using welding curtains.
These were made of UV protective red flexible plastic.
That turned out to be the perfect material for those window covers.
With some practising i managed to stitch them myself
and i am more than happy with the result.


woensdag 11 juli 2012

My new mobile darkroom has arrived

Last Saturday my new "Eskimo" mobile darkroom arrived.
The package was much smaller than i expected.
The tent is stored in a carrying bag which is about 120 x 20 x20cm.
Estimated weight is about 10 kilo.
So all very easy to handle.

To set up the tent won't take you more than 2 minutes !!!
Only 5 "pulls"are needed to make it ready for use.
Size is about 170 x 170 x 210cm.
So for me it's no problem standing upright without touching the ceiling of the tent.
It has two doors and 4 windows which will have to be covered with some red material.

The only backdraw is that it has many sewing pinholes.
But for that problem there is also a perfect solution : performix Liquid electric tape.
It took be about half an hour to close al the pinholes. great stuff.
Should be a perfect material to close pinholes from a bellows.....( will give it a try)

Can't wait to go outside.......

I WANT IT TO STOP RAINING !!!!!


woensdag 13 juni 2012

New source for Black Trophy aluminium

IMPORTANT UPDATE:

I just received samples from this firm. It turned out not to be a lackered material but anodised. So it is not the same as The Throphy aluminium from US. That doesn't mean it can't be used. I have used it before without any problems. Only point is that the black is a little deeper with the material from the states. Sorry for all this. I will keep on searching. Alex


I recently found a new source for the black aluminium.
This because Puttens ran out of stock and it will take a few months before they have new material. This company is from the UK.

OK, here we go. Prices for the black trophy aluminium :

13 x  18cm           £1.10   each     € 1,37
18 x 24 cm           £1.68   each     € 2,09
61 x 61 cm           £12,50 each     € 15,55

4 x 5”                    £0.62  each     € 0,77
5 x 7”                    £1.11  each     € 1,38
8 x 10”                  £2,00  each     € 2,49

The company name is : www.engravamet.co.uk
Contact person : Gemma Matthews gemma@engravamet.co.uk
She has been very helpful !!

Note, the above prices are without shipping costs and VAT, but they ship without VAT abroad she told me.

Now, don't shoot the messager.
I haven't tested this material yet, but it looks like it's from the same US source.
I have no relationship with this company. Just want to share this info !!

Alex

dinsdag 12 juni 2012

Found original head brace

UPDATE,

Nigel from Hongkong has send me a picture which was published in The telegraph recently.
It shows some people posing for a picture. Nigel pointed me at the headstand they were using. Although it is not the exacty the same one as i found at Bievres it comes very close regarding the design.

Nigel, many thanks for sending me this picture !

If anyone has more info about my stand, please let me know.


From the beginning on i have been using a homemade head brace.
It was made from several parts as a cast iron table leg, microphone stand etc.

Last weekend i visited the largest open air Photographic fair at Bievres. Beside some other interesting things i was lucky to find an original head brace!
They are extremely hard to find as they have been used only for a short period (daguerreotype and ambrotype).

Most parts are made of cast iron. I will have to do a search about its original colour as now it has an ugly fade yellow, greenish colour.
Any one has suggestions about its original colour? You can turn it in several directions and even change it to stand height!
I have not been able to find a manufacturers name yet.

Can you imagine how many posers have been using this brace more than 150 years ago?


vrijdag 30 maart 2012

Universal iris clamp

I just wanted to share this very versatile camera part with you.
It is called universal iris clamp or lens chuck.
They are available in different sizes.
The problem with lenses is that many of them are missing the lens flange. That makes it almost impossible to mount on a lens plate.
These clamps have very stiff aperture blades which makes it able to hold different sizes of lenses without using a lens flange. Most of the time these clamps are made of aluminium.

This beautiful clamp, made of brass, can hold lenses with a diameter from 2,5 cm up to 9,5 cm and up to a weight of aprox 2 kilo without any problem!

(BTW, this one is not for sale !)


dinsdag 10 januari 2012

They got married.....

I just couldn't wait any longer.
Made a lens plate today and "married" my new Large Vogtlander lens with my 20x20" Donchev camera.
(I have two original lens plates which came with the camera, but i hate to cut a hole in them........)The difference in age between he and she is huge.
The voigtlander was made in 1862 and the Donchev is made in 2011.
Lets call it a "modern" marriage
It looks just great on the ground glass and i definately want to make some work with this camera starting in 2012. So keep posted.

If you need any more info about the Donchev camera's, just have a look at Andy's weblog : http://donchev-cameras.blogspot.com/

woensdag 4 januari 2012

How to store your precious Ambrotypes

Making nice plates in one thing, but storig them in a proper way is at least that important.
Although your plates are varnished, it's very important to store your plates safely.
I bought my envelopes from the Dutch fotomuseum. They are acid free and have the exact European size ( 18 x 24 cm ).
They also sell smaller sizes !
Here you can order them : http://www.nederlandsfotomuseum.nl/component/option,com_nfm_verpakkingen/Itemid,794/lang,nl/index.php?option=com_nfm_verpakkingen&sub=detail&Itemid=794&id=233

I print the actual picture at the front. Just by using my laserprinter and at the back i print some additional information.
I use a safe shockproof aluminium case to store them vertical.
Storing them this way doesn't take you much space and they are safe.


maandag 2 januari 2012

Normal film plate holder part 2

In oktober 2010 i posted some pictures how to modify a normal film holder to a wet plate holder.
Here's the post http://collodion-art.blogspot.com/2010/10/normal-film-holder-for-wet-plate.html
I have got several questions how i manage to hold the plate into the plate holder as it has no door with a spring.
Well, actually this is quite simple. Just take a normal plastic (limonade) bottle. Cut a small part out of the bottom part (which is mostly the stiffest part) of the bottle  (about 1.5 x 3 inches) et voila:  you have made yourself a spring for your plate holder.
Just as simple as that.
Try to make it of a white bottle which makes it much easier to locate when you are working in the dark room.


zondag 25 december 2011

I finally found "Her".......

After a long search i finally found a suitable lens for my 20x20”Donchev camera.
This is a 24” early Voigtlander petzval which was produced aprox in the year 1864.
This lens is massive. I thought my 20inch Hermagis was big. This one is huge.
The glass is in execptional good shape. No separation, fungus or what so ever.
It came with one original waterhouse stop.


Some specs:
Weight :                         8,3 kilo
Height:                           39 cm
Diameter lens hood:        19 cm
Flange diameter:             23 cm
Serial number:                12540

Focal lenght                    24"
F-stop                             aprox 5.2 (because of waterhouse slot)


If anyone can supply me the exact production date of this lens, please let me know.
Just to show how massive this lens is, the lens next to the Voigtlander is my Dallmeyer 3B