I always have been fascinated by photography.
But with the introduction of the digital camera it all became too easy, too predictable …to me.
So I forced myself to go back to the roots of real analog photography.
Not just by making the photograph itself, but by controlling the entire photographic process.

This brought me back to the middle of the 19th century, to the amazing Collodion wet plate process.
And every single day I feel challenged to refine and improve myself.


For my website please visit : www.alextimmermans.com

Alex Timmermans
Holland


"You don't take a picture, it's given to you"

dinsdag 17 augustus 2010

making your own lens cap isn't that difficult

With some great help from Unrealalex from Russia i managed to make some nice lens caps.  http://unrealalex.livejournal.com/45453.html

For this i have used normal “passe partout” cardboard.
First cut a spacer. The thickness of that spacer is needed to fill the space when the leather is wrapped on the inside of the cap.

Make sure you put some extra tape on it. Otherwise this spacer wil stick onto the actual lens cap. Cut 2 identical strips. The width depends on the space you have on the lens hood. But don’t make it wider than 2 cm otherwise it won’t come of smoothly. Cut the first one at the needed length and wrap it around the lens (on top of the spacer which is already on the lens. Make sure that the ends fit perfectly. Secure it with a tape. Then wrap the second strip around it and make sure it fits perfectly also.
After that, take the two strips of and spray them with a glue and put them on the lens again. Secure them and Leave them for about 1 hour.


If you want to see larger pictures, just click on them


Then cut 2 squares about 2 cm wider than the actual capsize and glue and press them together.


After drying put some glue ( i have used simple white wood glue) on the strips and place the square underneath them. Use the weight of the lens to press these squares onto the strips which are taped around the lens. Leave it for about half an hour again. Make sure you wipe of the glue on the outside.


After a half an hour take of the cap, remove the glue which is left on the inside and shape it with a sharp knife. Use a sharp knife. Most accidents occur with knifes which are NOT sharp enough. Now you can see where the tape on the spacer is needed for...


Grind the edges until they are smooth ( i have used an electrical grinder for that, which works much faster)


Now cut a, larger than really needed, piece of leather and let it soak in normal water for about 30 minutes. I have tried it with dry leather but that only works with very small lens caps. When the leather is wet, it is much easier to shape it around the lens cap.
Make sure you get real thin leather. The best leather is sheep or goat leather.


Put the same white glue onto the lens cap.. Take your time. Stretch the leather nice and easy around the cap. Don’t hurry and don’t stretch it too fast, otherwise the leather will tear !!


To hold the leather. I have used a tie wrap which works much faster than anything else. Just leave it overnight. Don’t force it drying with a heater or so !! Be patient.


When the leather is dry, take of the tie wrap, take the cap of the lens ,and cut of the larger parts of the leather. Make sure there is enough leather left for the inside of the cap.


Now the most difficult part of making a cap starts. You will have to fold the leather to the inside, but the leather is actually wider than it should be. The easiest way to do this is putting on the cap without cutting the leather perfectly. Leave it for about one hour on the lens and after that you can see perfectly where it needs some extra cutting.Take your time, and do this step by step. For this part i have used normal contact glue

.

When everything is folded and glued you only have to cut the inlay of the cap. Cut it the same size as the actual lens shade. Glue this part into the lens cap. Start from the middle and work to the outside. You are able to stretch the leather if needed and let it fit perfectly.


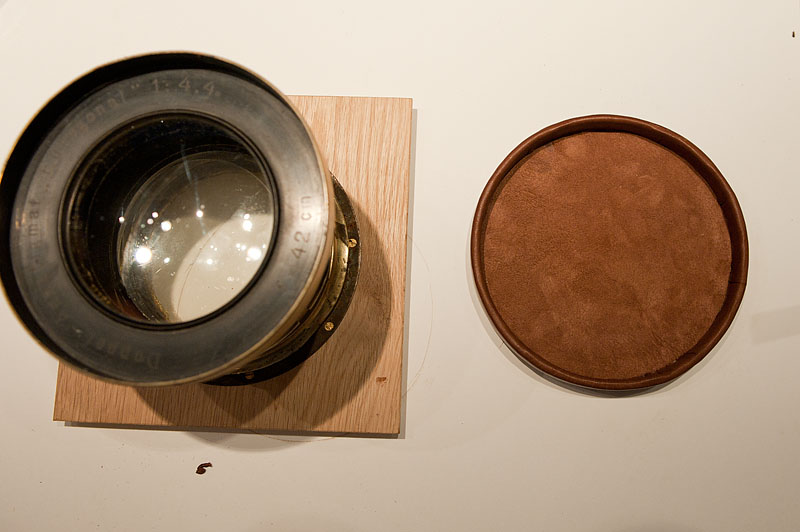


For finishing just use some neutral shoe polish.

Using the right material it will take you no longer than about half an hour making a perfect cap.


donderdag 29 juli 2010

What was wrong ??

Yesterday evening we tried to solve a problem a fellow wetplate photographer had.
No matter what she tried, her plates were always fogged.
I had the same problems when I started and I can tell you : that is so frustrating!!!!
Trying to solve that problem, i made dozens of plates almost without any help and never was able to solve it.

So we tried to make several plates last night.
The best thing to do is start right from the beginning.
Flow a plate, sentisize it and directly after that, develope that plate without leaving the darkroom.
When your silverbath and developer is ok your plate should look like the right one. So it must be "totally" clear. As you can see the left plate looks muddy or fogged (although I have seen them worse !)

My plate was with my silverbath and my collodionmix.  Clear
Her plate was with my silverbath and her collodionmix.  Fogged
Quick conclusion : with her colodionmix seems to be something wrong.

We were glad we found the problem so fast. To find a solution for such a problem you need help from outside otherwise it can take days or weeks  and lots of wasted chemicals.


dinsdag 20 juli 2010

How "The Alien" was made

Following is a brief explenation how "The Alien" was made.
Currently I am using 2 falconeyes studiolights 5500k with 9 bulbs each.
This picture was made with a noname petzval lens.
focallenght was 350 mm at 5.6
poorboy collodion
exposuretime aprox 4 sec
clear glass
KCN fixer.


a little flashlight from behind to create a body


two falconeyes daylight studiolights

First Dutch Collodion Day 04-07-2010


It's a fact. We had our first collodionday.
We were invited at Jeroen de Wijs his parents house. Beautiful house with even a more beautiful garden. First i would like to thank Jeroen and his parents inviting me and for hosting that really nice event.
As you can see we enjoyed the beautifull weather and had great fun. We tried many camera's and lenses and we even made some nice plates. At the end we were invited for a very nice barbeque and drunk champagne.
We had a great time !!


Gerda flows one of her first outside plates under supervision of Geert-Jan


Lots of nice gear


Indra's "growtent"


Posing for a digital picture !


Jeroen standing next to his mobile darkroom.


Posing.......
Champagne  !!!

Some results